We Be Jammin’…Blackberry Orange Chia Jam-min’

Oh howIMG_20150610_091934 
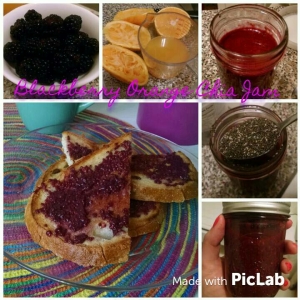
I love jam, a foodstuff I couldn’t stand as a kid, I love now! It’s pretty versatile if you think of it: spread it between two slices of bread with any variety of nut butter, top your breakfast quinoa (this idea came from my roommate, which honestly I’m bummed I didn’t think of sooner), or just eat it straight out the jar, because it’s fruit so it totally counts, no?

Well, here at Another Food Love, I love to make my own jam, and while the traditional method can usually be time-consuming, this recipe is the quick, no added sugar, raw version of that. Sound like all good things? It sure is! Plus, yay, take in some Omega 3s!

I’ve been on a chia seed kick in the last few weeks. I find myself looking for recipes to add it to, mainly in breakfast foods is where I’ve found it’s best uses. Think: chia pudding, overnight oats, on toast, and now JAM!

For this jam, the fruits and liquids used are interchangeable. For this particular recipe, I used blackberries and fresh squeezed orange juice, but honestly, any combination would work. I’m excited to try different combinations soon, maybe even add some fresh spices – mint or basil would add awesome layers to a jam. The possibilities are endless!

Here’s what you’ll need:

Blackberry Orange Chia Jam 

8oz container of blackberries

2 medium navel oranges, juiced

2-3 tbsp of chia seeds

Let’s get to it:

Super simple steps: Add to a blender the blackberries and fresh squeezed orange juice, and blend together until smooth. It will be a bit thick in consistency, that’s perfect! At this point, I strained it into the mason jar*, to remove any blackberry seeds. Once all the mixture is strained into the mason jar, add the chia seeds. I stirred em in, but you can get a mini arm workout in, cover the jar and shake away! Leave in the fridge for at least a few hours, but it’s best left overnight. Once the chia seeds have absorbed the liquid, it’s ready for spreadin’.

It has a mild sweetness to it, that comes only from the fruits. If you prefer a sweeter jam, you can certainly add a bit of your preferred sweetener before blending.

The tools I used for this, an average blender, a strainer, and an 8oz mason jar (average size jam jar, or similar container). *If you’ve got a high speed blender, you can probably skip the straining step.

Be creative, and share some of your combinations for no-fuss summer jams!  How do you use jam?  What’s your favorite way to eat it?

Kale Walnut Pesto

Weather has been fantastic in New York the last week or so, beautiful, warm, sunny!  Spending long days outdoors have become a regular thing again. But attempting not to spend money outdoors on (fabulous) food when I’ve got a fridge full of produce has proven difficult when thinking of heating up my little kitchen does not sound appealing.  The solution: pesto! OK, so I’ve still got to turn on the stove for the accompanying pasta for said pesto, but that’s a small price to pay for the minimal sweat I break for this meal.

Oh, and did I mention this is a twofer? I created this pesto as a result of trying not to be wasteful, using the remnants of my favorite green juice as the base of the pesto. The result is an non-traditional yet still delicious pesto, using walnuts instead of pine nuts (although I do love those pricey little suckers), and nutritional yeast in place of the usual parmiggiano-reggiano cheese.

To start, let’s take a look at the ingredients I juiced for the yummy green juice:

5-7 leaves/stalks of lacinto kale IMG_20150525_165425

2 fuji apples

1 inch of ginger root

2 celery stalks (not pictured)

Using my roommate’s juicer, it was easy to juice these fruits and veggies to create a yummy green drink! But if you don’t have a juicer handy, whizzing these ingredients up in a blender and making a smoothie also comes out very well. Just add 1 cup of water before blending all ingredients together. But clearly, if you make a smoothie, then (in my best Seinfeld Soup Nazi voice): no pesto for you! 🙂

Now on to the pesto! Super simple stuff here: take juice pulp (roughly about 2-3 cups of pulp) and blend together with the rest of the ingredients!

IMG_20150526_102313Here’s what you’ll need:

2-3 cups Kale Apple Juice pulp

1/4 cup of raw walnuts

2 garlic cloves

1/4 olive oil

1 – 2 Tbsp nutritional yeast*

lemon juice (optional)

Blend all ingredients in a food processor or blender until well combined and creamy. The lemon juice isn’t necessary but is nice to wake up all the flavors and also hide the bitterness the greens may have, it all depends on your palate.  I like to serve it mixed with pasta, makes a super simple creamy pesto pasta. And top the pasta with some heirloom cherry tomatoes. It’ll work with whatever pasta you prefer: regular semolina pasta, a whole wheat pasta, or any variety of gluten-free pasta. In a pasta dish for two, you only need to use about 2-3 tbsp of pesto to coat, but not overwhelm, the pasta. You can also find all kinds of other used for this awesome spread: on a sandwich or combined as an extra flavor on top a seitan steak, maybe? This makes about 8 ounces of pesto, so there’s enough for multiple use. And easily stores in the fridge for a couple of days.

*If you’re not familiar with nutritional yeast, the taste takes some getting use to, so start off using a smaller amount at a time. I go for a full 2 tbsp, but I built up to that as well when first using it in recipes.

What are some of your go to warm weather recipes? Fill me in! I’m always up for new food ideas/recipes. And, let me know what other ways you use pesto sauces!

Fiesta Fajitas

Who wouldn’t love a good celebrIMG_20150505_090609ation with festive foods to accompany all the fun?!

That’s one of the reasons New Yorkers flock towards holidays like Cinco de Mayo. It is one of those holidays that people of all walks of life find fun here. It’s an exciting unofficial start of warm weather dining outdoors with tasty foods and boozy drinks that scream summer before summer begins. So how can our vegan buddies join in on the fun? Easy! Portobello mushroom Fiesta Fajitas! Mushrooms are one of those versatile foods that are meaty in texture and take on the seasonings you toss at ‘em. Perfect for some fun Mexican flare.

I tested these out on my roommate and she loved them.  She’s not vegan and loved the taste and texture, pointing out that she wouldn’t even think twice about any meat missing in this dish. I added the no-beef broth to give the essence of that flavor meat eaters love to say they’d miss about steak so much so they would never be vegan. The base of this recipe comes from Happy Herbivore’s fabulous portabello steaks. Specifically her combination of the broth with balsamic vinegar gives the mushrooms that full bodied beefy flavor.  Let’s get started!

What you will need:

2 portabello mushroom caps, sliced

1/2 medium yellow onion, diced

2 garlic cloves, minced

1 red bell pepper, sliced

1 cup no-beef broth*

1 tbsp. balsamic vinegar

1-2 tbsp. taco seasoning**

¼ cup cilantro

2-4 leaves of lacinto kale

Flour tortillas

Let’s get cooking:

First, add some olive oil (about 1-2tbsp) to a pan set to medium heat, toss in the onions and peppers, add a pinch of salt and pepper, and saute for about 5 minutes until onions are translucent.

Toss in garlic and cook another minute or two before adding in about a ¼ cup of the no-beef broth*, making sure to scrape up any brown bits from the bottom of the pan (the added flavor for our beefy sauce).

Mix into the pan the tbsp. of balsamic vinegar and your taco seasoning**. At this point if the no-beef broth has cooked down too much, add another ¼ cup.

Add in the sliced portabella mushrooms, and nestle them into the saucy pan, cover and cook for about 5 minutes for the sauce to get soaked up. Give your portabellas a toss, cover pan and cook for another 5 minutes on the other side, adding more broth if necessary. Portabellas are done when they’ve softened and taken on the deep color of the broth, and the flavors of the balsamic and taco seasoning… YUM!

While the mushrooms are cooking, you can remove the rib from the kale. (That’s the stalky tough stem of the kale.) I used kale with these fajitas for their hearty texture, but any preferred green would work if you’re not a fan of kale.

Next, heat a dry pan to warm your tortillas, a few seconds per side. Watch not to dry them out and make them crisp!

Once the mushrooms are done, you’re ready to plate them. Layer the tortilla with the kale, then the mushroom, onion, pepper combination, top with chopped cilantro and enjoy!

*No-beef broth can be purchased boxed like your usual vegetable or no-chicken based broths, or you can also use Edward & Sons brand no-beef bouillon cubes (which can be mixed with boiling water, and used just like the boxed broth). I like keeping a few of the bouillon cubes handy (saves space in my little Manhattan kitchen cabinets!)

**For the taco seasoning, I mixed my own spices together using the measurements off this recipe from allrecipes.com, altering slightly with a bit more garlic and minus onion powder (since I was out of it). It was the first time I had mixed my own spices, and I really liked this recipe I found. But you are welcome to use whatever taco seasoning you’d prefer!

Let me know what you think would be another awesome addition to your vegan Cinco festivities!

Reinvent. Re-imagine. Redo.

This past few months (almost coming up on a year!) has been a crazy whirlwind ride for me. So many things in my life changed in ways I could have never foreseen in a million years. I wouldn’t change anything that has happened but it has taken some getting use to.

With all of these new things: going through an intense breakup, leaving my cat behind (for the sake of his well-being and stability), moving around for 6 months before finally settling into a new home, re-imagining where my life is headed altogether, I’ve actually had one constant: my veganism. That has stayed with me and still continues to help me to grow, and be more conscious of my surroundings.

Veganism has taken on a new form for me. It’s helped me to still stand for something while I was sorting through the kind of person I am, and want to continue to be, moving forward through life’s changes. It allowed me to still feel me even when I wasn’t sure who I was. A lot of my life has been focused on helping others, and while that’s not a bad thing, it often leads me to ignore myself sometimes (which is never a good thing!) Veganism is about helping others, those among the most important groups of beings who can’t help themselves against injustice and mistreatment. But it is also empowering mentally and physically for me to regain good health, be more conscious of people and animals, and to take moral obligation for the world around me to the best of my ability.

So for that, this space, blog, site, will be an exploration of all things vegan. Not just food and diet, although there will be many posts on this because who doesn’t love food! But the larger unethical expanse of everyday products that most people wouldn’t even begin to imagine contains any animal product or byproducts in them. It will sometimes edge on the healthy side (and sometimes not so healthy side) of veganism. The creative side. The adventurous side. The inquisitive side. All will be explored as I make it a mission to make conscious consumption of all things animal-free more relatable. This is a boost to what I intended for this site when I started it, this is it’s official redo.

Although I have been vegan for a couple years now, there are still things I am learning about that can contain animal products in an otherwise thought to be animal-free products. So help me out for future posts, what is something you found out was or wasn’t vegan that made you go “what? wait, how? why?” (That might just be my reaction to things, but you get the idea!)

Warm Farro Soup for the Cold Weather

Image

So the last few weeks have been super tiring. I have either been sick or caring for sick children.  I cannot wait for this winter to be over already!  I am usually not a person to get sick easily, but this year I’ve had the flu, a sore throat/fever fiasco, and just generally congested ALL winter!  And baby-sitting lil ones is in itself a straining task, albeit sad to see them out of it.

So in order to beat the winter flu’s and blues, I make a wonderful Farro Soup adapted from a friend’s Italian family recipe. Italian food is my all-time favorite cuisine!  It’s generally easy to get quick simple recipes to alter to your taste. Unless you’re not a fan off pastas, tomatoes or basil, Italian foods can be for you! Farro is a grain that I can best describe as similar to barley. It is closer to emmer, but that is also a grain many people may have not heard of and I find it’s hard to describe all the differences.

This soup does not disappoint. It is an easy to prep, hard to mess up, delicious way to warm you and your kitchen right up!

FARRO SOUP (serves 6-8)

Ingredients

1/2 medium onion (chopped)

1-2 cloves of garlic (minced)

1 bag Baby carrots (chopped)

5-6 stalks of celery (chopped)

1/2 35oz can whole peeled San Marzano tomatoes

1 15oz can cannellini beans

1 5oz bag baby spinach

1 cup cooked farro

Oregano to taste

Extra Virgin olive oil

Directions 

In a medium sized stock pot, at medium heat, add 2 tbsp olive oil, add onions and garlic.

When the onions become translucent, add the carrots and celery, adding salt and pepper as you go.

Puree half the 35oz in a food processor, and add to the pot. Set the other half of contents for use in other soups or sauces. Using the empty tomato can as a guide, add twice the amount of water (it uses up and remaining sauce in the bottom of the can and adds liquid to your soup). Add oregano, as well as salt and pepper if yet to be added, to taste.

Cook for 30 minutes. While the soup cooks, boil water in a separate pot for the farro. Similar to pasta, add the farro to the boiling water (salt optional) and cook for 20 minutes until it is al dente. Strain and set aside to add to the soup when ready.

After the 30 minutes, add the spinach and cannellini beans and cooked farro. Stir and let cook for 1 hour. Then, Enjoy!

I love this soup because it is something I have made since before I transitioned to a plant-based vegan diet, but it is something I can still make as a vegan. It’s simple things that made it easier with the transition from omni eating to plant-based foods alone. Like a lot of forums, people found in hard to not give up cheese or ice cream, etc., which I thought I might have a problem with as well. Similar to other diets, there is something always being eliminated…meats, carbs,etc.

The farro soup is often served with some parmiggiano-reggiano cheese grated on top, instead I subbed a light sprinkle of olive oil and enjoyed it even more without the cheese.

Has there been any one food you miss since switching your diet habits recently or in the past? What is one food you think you could eliminate without any question?

New Year, New Outlook

Being a sitter has its consequence during the school year:

1 horrible eating habits between shifts and after.

2 not having time to blog when you want to

I had the worst schedule a sitter could have, that is one with many breaks in between. Now that sounds great at first. That’s why I took the job. But who really wants a constant schedule of hectic early mornings, lazy late mornings, hectic afternoons/evenings. Oh, did I mention the travel back and forth, THAT was the most annoying part of my schedule. Plus, the most expensive part.

Anywho, it’s a schedule that didn’t lend itself to good eating habits.

Now that I changed my schedule for the new year, purging my hectic schedule for a less stressful working environment (in terms of parents, not children), I have been able to adjust other aspects of my life as well. My health, mental and physical, being the biggest reason for these adjustments.

The stress I had with my old schedule didn’t seem worth it. I gained weight, I wasn’t spending time with my family, friends or boyfriend because I was too tired, I was depressed because all I was doing was managing someone else’s schedule before my own. It wasn’t what I wanted or needed.

I took steps towards better eating habits throughout the end of last year, changing the dairy to plant-based options for milk and cheeses, eating more grains, seeds and nuts, and making sure to eat whole meals.

And, oh my gosh, breakfast totally matters!  I started to notice small changes, feeling more energized, less weighed down. But it was the schedule change that was the kicker. That’s when I started feeling happy!

I have a lot of time to do my food research and figure out healthy meals (and the occasional indulgence) for me and my boyfriend, who has willingly taken this journey with me.

I hope to start blogging more in 2013 and can’t wait to share some recipes I’ve begun to stock pile!

xoxo

Fool for Fall…and Pumpkin!

In wasting my August away, forgetting to take those wonderful photos of all the recipes I’ve been tackling in order to blog about them (oops!), and getting back into doing the job thing, I’ve noticed I really miss Fall!


The weather can cool down. The colors go from bright and lively to deep and saturated. And, I have regular sitter work again!


But the best part of Fall is apples and pumpkin!

I love love love both those things and to have a season surrounded by them is absolutely fantastic!


So I’m starting off early bringing fall to my kitchen with Pumpkin Scones!

I had a small task of substituting the dairy ingredients for non-dairy alternatives (one of the kids that I wok with has a dairy allergy), but found it made for an even tastier scone!

Image


The Ingredients

2 1/4 cups Complete pancake mix (I used Aunt Jemima buttermilk complete)

1/4 sugar

1 tsp pumpkin pie spice

1 stick margarine, cubed

1/2 low-fat almond milk

1/4 cup + 2 tbsp organic canned pumpkin

about 1/4 tsp vanilla

1/4 cup dark chocolate chips

flour for kneading the dough


Preheat oven to 425 degrees. Mix pancake mix, sugar, and pumpkin pie spice. In a separate bowl, blend together the almond milk, pumpkin, and vanilla until smooth. In a mixer, add margarine to the dry mixture and mix until it has the consistency of coarse crumbs (about pea sized). Slowly mix in the pumpkin mixture. The batter with have a sticky consistency, when the liquids are fully combined with dry mix. Flour a work surface, and turn out the batter, adding more flour on top. Add the chocolate chips, kneading them into the batter. Knead the batter for about 10-12 turns, adding flour when needed.


At this point, you should be able shape the dough in a circle and cut about 8 triangles. This dough, however, was too sticky for me to shape this way, and so not to over-knead the dough and deflate it, I divided the dough by making about eight 2″ balls.


Bake for 12-15 minutes. And… viola!….


Image

Pumpkin Chocolate Chip scones!


I used a small amount of pumpkin pie spice thinking that too much spice would overpower the scones, but then found myself missing the punch of the PPS. So if you like a stronger spice, you can experiment there. Also, regular milk and butter can be used where i used almond milk and margarine, if you prefer.

In order to reintroduce a heightened amount of pumpkin pie spice, I added a touch of PPS to the simple icing I made for the scones:


Image

Icing

1/2 cup powdered sugar

2 tbsp almond milk

1/4 tsp vanilla

1/8 tsp pumpkin pie spice


Combine all ingredients together until smooth.


I enjoyed how these scones came out, the smell of fall filled my little kitchen and made it absolutely the best way to ring in the start fall, even if I am a little early. 🙂


What are your favorite parts of fall? How do you like to ring in the fall season?

Breakfast for Dinner

As a minimally employed (at least for the summer) babysitter, cooking and baking has become a way to keep busy while being home for most of the week. I haven’t yet gotten into the groove of blogging often, but I have been busy making new recipes like I planned. Today, I actually remembered to take a picture! And for the fact that I  made these scones and jam late in the day, they became dinner.


Cinnamon Chocolate Chip Scones 


They were very simple to make, and even easier to eat. Made using some pancake mix, it was one of the easiest scone recipes I found. With the addition of cinnamon, chocolate chips, sugar, butter, milk and vanilla, it does not make for a particularly healthy snack. But it sure tastes yummy!


I also made a simple jam of  1 cup sugar to 1 cup mixed strawberries and blackberries. My very first time making jam, and it wasn’t so bad. I would love find any recipes using agave nectar in place of sugar though.


Full scone recipe to be posted soon!

My Introduction into the Blogosphere

The last time I wrote in a blog was ages ago (“ages ago” is the equivalent to sometime in college) when writing in online personal journals were a thing. Was that ever really a thing? Point is, I’m a little rusty.  Anywho…

My intentions for this blog is to discover new ways to think about food and to chronicle my experiences, or lack thereof, of cooking new meals. I’ll possibly even take on those family recipes I’ve yet to tackle out of sheer fear that it will end up with a mess of a meal. Who really wants to mess up their favorite meal grandma used to make? Maybe, I’ll be able to come to terms with the fact that my variation may end up just as good?

Also, I just wanted a space to experiment and talk to others about their experiences when they create new dishes and recipes for themselves or families. I’m pretty picky so navigating foods has been interesting.  I have such an urge to try new things but there are just some foods I won’t go near… mushrooms, anything spicy with heat, just to name a few (or two).